Wednesday, February 25, 2009

Slacking Again

Excuses, excuses, excuses....story of my life, which is why I never seem to get the hang of regular posts.

I have been busy quilting--rather piecing. Here's a photo of what I locked myself in my workroom with the weekend before last.


This is the 2007 Thangles Buck a Block...my very first piecing project. It got better as the months progressed. I actually did finish the blocks in 2007, they just sat in a box while I made the 2008 Buck a Block blocks. Now that I've started the 2009 (which I really like the color combo), I thought it might be a good idea to go back and actually finish the ones I've finished.

I made up the sashing and sashing squares (which used leftover fabric from the blocks). It will have a light blue print backing. All that remains is to whip out the 'sandwich table' and put it together...oooh, I can use my new curved safety pins my daughter put in my Christmas stocking.

I seem to be avoiding doing that, probably because once I do I'm comitted to machine quilting, and it's just a bit larger than the last piece I freemotioned on my 1260. So this weekend I pulled out my Baltimore Blues applique blocks and finished one block and started another. Sometimes it just feels right to do some hand sewing.

Hopefully I'll do a little quilting this weekend. Or maybe I'll pull out the Babylock and learn how to serge...Lord knows I've had that machine for 5 years now and never even plugged it in.

I've also got a Santa I'd like to make (Beachwalker)--yep, the one I've been procrastinating about for the past 2 years--ever since Cap'n Jack was finished, but I'm still not feeling the doll-making creative vibe enough for that one. I need a beach trip for some inspiration, so he may have to stand down until we get back from Hawaii, though I have been thinking it might be fun to just suck up the 3 hour drive and hop in the car and head to the Eastern Shore for a little Winter Beach Walk.

Tuesday, February 10, 2009

Black and White Challenge Project


To show that I'm not slacking, I'm attaching a photo of a work in progress. The plan is to make a throw for my daughter using a black and white jelly roll she gifted me for Christmas this year. To spice it up, I'm going to sash in red and the backing is a most excellent Moda red with white print.

I've got 4 block patterns going, two opposites in each pattern (swapping black for white in the pattern I'm using).

The plan is to use the 2-1/2" strips to create 8 striped blocks and 8 checkerboard squared blocks as well. Though I may need to cut that to a smaller number once I see how it's working out size-wise.

No real pattern here, just using some of the Thangle block patterns from the 2007 Thangles BOM. (I love using Thangles--so much cheaper than rotary cutter blades and band-aids).

Two more blocks to put together for the 2008 Thangles BOM. Need to find a good print fabric for that one. Lots of wild colors going on there. (It's the swatch ring on the far right). Last night I started on the final two blocks, and tonight I'll finish them and post a photograph of the 12 blocks.
Considering that I still haven't put together the 2007 Thangles BOM (swatch ring on far left), it's time I finished something before I run up to 'far north' Frederick this weekend to pick up the first block in the 2009 series. I really don't want to become a collector of unfinished pieces of quilts. I'd much rather be known for finishing what I started (hmm.....wait.....how many half finished needlepoint and crewel projects are in a box in my basement right now, and have been there for 30 years?).
Well, I'm not going to be an 'old dog'. It may be too late for those needlework projects, but I will finish every quilt I've started this year. (fingers crossed)
(........Well, ............maybe not ALL those Baltimore Album applique blocks... )

Sunday, February 8, 2009

No-Sew Valentine's Heart Garland -- Tutorial


Gather your materials (see materials list in previous post)

Determine what size heart you would like to use and cut template from a folded sheet of paper.


For this tutorial I used 9 hearts...3 each of 3 different fabrics. Cut 3 fabric squares slightly larger than your template from each of your fabrics. Also cut 9 squares from the fusible bond material slightly smaller than the fabric squares.


Iron the 'sticky' side of the bonding material to the wrong side of the fabric. Follow manufacturer's diretions on the packaging for ironing.


Fold fabric with right side out, place folded pattern on fold and cut out hearts. Do not discard scraps.


Cut a smaller heart template to fit inside the large heart.


Cut a smaller heart from each of the fused scrap squares left over from cutting the large hearts.


Peel backing from hearts.


Lay out hearts across width of fusible material leaving minimum of one half inch above and below and one inch in between and from sides. Cut enough strips of fusible web to cover number of hearts you cut.


Use the fusible web as a template to cut your backing fabric.


Iron fusible material to wrong side of fabric backing.


Peel away paper.


Iron fabric to batting. Be careful to keep your iron on fabric as the batting will tend to stick to your iron.


Trim off excess batting.


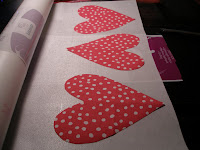
With batting side up, lay cut hearts across batting leaving at least one half inch around and one inch between hearts.


Fuse hearts to batting.


Cut out hearts, leaving one quarter inch or more of batting showing around edges.


The batting edge will only appear on the font side of your heart, so don't think you've cut something wrong when you flip it over and see solid fabric.


Fuse small hearts to fronts of larger hearts.


Using a strand of crochet thread (or ribbon) threaded through a doll needle, thread through a button, tie a knot and make a knotted bow. Take your threaded needle through the front of the tip of the heart and tie a double knot at the back to secure. Add buttons or beads to each heart, or every other heart, as you like.


To attach the hearts poke needle through front of first heart, tie a double knot to secure, bring needle up through back of second heart, leaving at least one inch of thread and knot. Continue ntil you have all your hearts strung with all knots on the fronts. Snip threads to uniform length. I used 3 colors of crochet thread together to do this.


On the end hearts, knot a 12" length of thread through the front of the heart and tie off end in a loop to hang.


There you have it, your very own No-Sew Valentine's Heart Garland. Find somewhere to hang it and stand back and admire your job well done.


Thursday, February 5, 2009

No-Sew Valentine's Heart Garland - Materials List


I'll be posting my first tutorial this weekend for this easy to make Valentine's Heart Garland....but first I need to make another that I remember to photograph as I'm working.

If you'd like to gather your materials, here's a list of what you'll need:

Valentine print fabrics (a fat quarter in a few different prints will be way more than enough, or if you sew, check your scraps. I used 4 red prints and 2 pink)

a quarter yard of a solid red or some other print to use for the backs of the hearts

a craft-sized project package of the blanket-type quilt batting, or you can buy it by the yard at JoAnn--a quarter yard will do you (do not get the fluffy stuffing-like batting. You need the kind that's a nice smooth sheet)

a package or a yard of Wonder Under or some other type of fusible web used for crafts and applique

some string/yarn/ribbon to string it together (I bought the skeins of crochet thread at Michaels. It's with the embroidery floss, only it's thicker and it's twisted into a hank. Sells for $1.39 each. One is plenty unless you want to be fancy and use multiple colors.)

a doll needle (this is a thick needle with a very large eye which will allow you to thread 3 of the crochet threads at a time or a thin ribbon through the needle's eye)

buttons or beads to dangle from your hearts